Wednesday, May 30, 2012

The Best Rice Krispie Treats


So it was 1000 degrees in Chicago this weekend.  1000 degrees.  I called the President of Weather and he confirmed it.  He also apologized for making it so hot.  He didn't sound very sincere though.    

So one solution with that kind of heat is to eat an entire watermelon by yourself in a matter of 24 hours.  Trust me, it's possible and I recommend it.  Although I don't recommend transporting the watermelon on a city bus. It sounds fun but it's really not.  It's safe to say that any activity involving a city bus isn't fun.    


Another solution is to not bake.  Don't even think about turning on an oven if you live in an un-airconditioned apartment.  You won't stop sweating for days.  Even three cold showers, two fans, and head-to-toe cotton won't help.  Watching The Bachelorette won't help either.  I definitely tried that though.  
  
Instead, get yourself to a stove, melt some butter and marshmallow and make these babies.  I know it seems a little silly to post a Rice Krispie Treat recipe.  Any ol' fool can make Rice Krispie Treats.  But these a just a liitttllle bit special.  And I can say, without a doubt, these treats are the absolute favorite amongst my friends of any treat I've made.  I've slaved away in the kitchen for hours on other treats and these still win out every time.  Or at the very least, it's a change of pace from a whole watermelon.  

Here's the recipe!

Ingredients:  
Bottom Layer:
3 Tbsp butter
10 oz bag of mini marshmallows
4 -5 cups Fruity Pebbles

Top Layer:
4 Tbsp butter
12 oz mini marshmallows (doesn't have to be exact)
1/4 cup butter cake mix
6 cups Rice Krispies
Sprinkles (optional)

Instructions:
1.  Spray a 9x13 pan with cooking spray and set aside.  Melt 3 tablespoons of butter for bottom layer in a large saucepan over low heat until mostly melted.  Add 10 oz of marshmallows and continue to stir, melting the marshmallows slightly.
2.  When the marshmallows have have melted slightly but still have some shape and remain somewhat puffy, add Fruity Pebbles and stir to incorporate.  Pour mixture into pan and press into an even layer.  I sprayed my hands with cooking spray and worked quickly using my bare hands.  
3.  Using the same saucepan, melt the 4 tablespoons of butter until mostly melted.  Add 12 oz of marshmallows and allow to melt until soft, puffy, and still retaining some shape.  Mix cake mix into mixture until cake mix is dissolved.  Mix in Rice Krispies and stir to incorporate.  Pour on top of Fruity Pebble layer and press into an even layer.  If desired, decorate with sprinkles and press lightly into the top layer.  
4.  Allow to set for at least 30 minutes.  Cut into desired pieces and serve.  If necessary, they can be stored in an air-tight container overnight.  

Enjoy!

Recipe adapted from I Heart Naptime
    

Monday, May 21, 2012

Coconut Coffee Chocolate Chip Cookies


Definitely don't make this dough and then pretty much eat half and then actually make some cookies after you've eaten half the dough.  Not that I did that though.  It just seems like something that could maybe happen to someone.  


But maybe if you really really like tiny little coffee granules mixed in with chocolate and coconut and butter and sugar then MAYBE you should eat some of the dough.  Someone has to test the product, right?  Life is so hard sometimes.


Like when you make a batch of cookies and you have to eat a fresh warm one right out of the oven.  So difficult.  Or when you have a lazy Sunday and are forced to read Game of Thrones or watch a Tudors marathon.  Exhausting.  Or when you order a gigantic iced coffee on a warm May Saturday while you read The Onion.  LIFE ISN'T FAIR.


These cookies make it a little easier though.  So you'll just have to make a batch.  It's only fair.  

Here's the recipe!

Ingredients:
3 1/2 cups all purpose flour
1 tsp baking soda
1 tsp salt
3 Tbsp instant coffee 
1 cup butter, softened
3/4 cup packed brown sugar
1 cup granulated sugar
2 large eggs
1 Tbsp vanilla extract
1 cup chocolate chips
3/4 cup shredded, sweetened coconut


Instructions

1.  Preheat oven to 350 degrees and line baking sheet with parchment or a silicone baking sheet (or spray with cooking spray).  Set aside.  
2.  In a medium bowl, combine flour, baking soda, salt and instant coffee and whisk to combine.  Set aside.  
3.  In the bowl of an electric mixer fitted with a paddle attachment, cream butter and sugars until combined, about 1-2 mins.  Add the eggs, one at a time, and then add vanilla until combined.  
4.  With the mixer on low, slowly add the flour mixture to the sugar and butter mixture until fully incorporated.  Using a wooden spoon or spatula, scrape the sides of the bowl and fold in chocolate chips and coconut.  
5.  Drop dough onto prepared baking sheets, about 2 tablespoons in size and 2 inches apart.  Bake cookies one sheet at a time for about 10-12 minutes, rotating the pan half way through baking.  These cookies don't spread a lot when baking so you can slightly flatten with a spatula when removing from the oven.  
6.  Allow to cool on sheets for about 3 minutes before moving to a wire rack to cool completely.  

Enjoy!

Recipe from Baker Girl

Monday, May 14, 2012

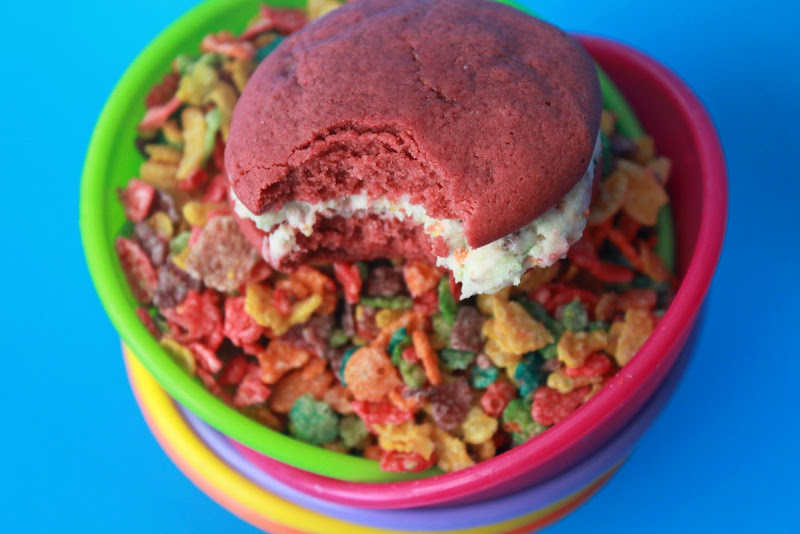
Pink Velvet Fruity Pebble Whoopie Pies

Sooooooo yeah.  This recipe involves crushing up some Fruity Pebbles and mixing it into buttercream.  So obviously it's not good.  NOT.  Now I only want to eat my cereal with buttercream.  Breakfast of champions.  
I've always associated certain cereals with certain family members.  Fruity Pebbles- Grandma Anna.  Old school Barbie cereal- Grandma Tina.  Grape Nuts- Dad.  Honey Nut Cherrios- Me.  Cocoa Puffs- Me.  Frosted Flakes- Me.  Okay, I like cereal.
And these whoopie pies have really opened the doors for all kinds of interpretations.  Think of the cereals you can crush into some buttercream.  No really, I'll give you a minute.  Think about it.  
Do you guys usually store your Fruity Pebbles in multi-colored pinch bowls?  I do obviously.  You don't even want to know what I store Cap'n Crunch in. 
MMMMMmmmmm, breakfast*.  (*Do not take nutritional advice from me)

Here's the recipe!  

Ingredients:
2 cups all purpose flour
2 Tbs cocoa powder
1/4 tsp baking powder
1/2 cup butter, room temp
1 cup light brown sugar
1 egg
2 tsp vanilla
1/2 cup buttermilk
red or pink food coloring

Buttercream
1 cup finely crushed Fruity Pebbles (about 2 1/2 cups uncrushed)
1 cup butter, room temp
2 cups powdered sugar, sifted
2 Tbs milk

Directions:

Whoopie Pies:
1.  Preheat oven to 375 and line baking sheets with parchment paper.
2.  In the bowl of a stand mixer fitted with the paddle attachment, cream butter and sugar together until light and fluffy, 1-2 mins.  Add egg and vanilla and mix until combined, about 1 min.  
2.  Combine flour, cocoa powder and baking powder in a separate bowl.  With the mixer on low, add 1/3 of dry mix and allow to mix, then add 1/3 of buttermilk.  Continue in this order until all flour and buttermilk is added.  
4.  Add food coloring with mixer on low until desired color is reached.  Be sure to scrape the sides of the bowl to evenly distribute color.  
5.  Transfer batter into a piping bag or a ziplock bag with the tip snipped off.  Piper batter onto baking sheets 2 inches apart, making about 1 1/2 inch whoopie pies (or desired size).  
6.  Bake about 6 minutes until set.  Allow to cool 2 mins on the baking sheet and transfer to a wire rack to cool completely.  

Buttercream
1.  Cream butter in the bowl of a stand mixer fitted with the paddle attachment, about 1-2 mins.  
2.  With the mixer on low, slowly add powdered sugar until fully incorporated.  Then add milk and turn mixer to medium speed and mix until smooth and fluffy, about 3-4 mins.  
3.  Turn mixer back to low speed and add crushed Fruity Pebbles until incorporated.  

Assemble pies by piping buttercream onto one side of an upturned whoopie shell and topping with another shell.  Enjoy!    

Recipe from Cookies and Cups

Thursday, May 10, 2012

Bran Muffins

We're all adults here, right?  We have "careers."  We do laundry regularly.  We don't understand kids today.  We say words like "401k."  And sometimes we just need some bran too, ok?  Admit it, sometimes you need bran.     

But we might as well eat it in a muffin.  It seems only fair.  And boy are these muffins hearty.  They're moist, they've got great texture, and topped with sliced almonds, they've got a slight crunch.  Mmmmm, adulthood.    

In the interest of full disclosure though, I don't say 401k very often.  And I do laundry slightly less than regularly.  Instead, I just keep buying new socks.  That's the same thing right?  


The point is, I've got a pile of laundry and no retirement savings but I have some... ahem... regularity in my life.  Be regular with me.  

Here's the recipe!

Ingredients
2 1/4 cups All-Bran Original cereal
1 1/4 cups all-purpose flour
1/2 cup whole wheat flour
2 tsp baking soda
1/2 tsp table salt
1 large egg
1 egg yolk
2/3 cup packed light brown sugar
3 Tbsp honey (or molasses)
1 tsp vanilla extract
6 tablespoons butter, melted and cooled slightly
1 3/4 cups plain yogurt**
slivered almonds for topping (optional)

**I used non-fat yogurt but the original recipe calls for whole milk yogurt.  I loved the muffins with the low fat substitution.  

1.  Adjust oven rack to middle position and heat to 400 degrees.  Spray muffin pans with non-stick spray and set aside.  

2. Process half of bran mixture in food processor until finely ground, about 1 minute.  Whisk flours, baking soda and salt in a large bowl and set aside.  Whisk egg and yolk in a medium bowl for about 30 seconds until well combined and light-colored.  Add sugar, molasses and vanilla and whisk another 30 seconds.  Add melted butter and whisk; add yogurt and whisk.  Stir in processed and unprocessed cereal and let the mixture sit about 5 minutes until evenly moistened.  

3.  Add wet ingredients to dry ingredients and mix with a rubber spatula until evenly moistened.  Do not over mix.  Using 1/3 measuring cup or ice cream scoop, divide batter among muffin cups.  Alternately, you can use a jumbo muffin pan, evenly diving batter amongst six muffin cups, to make 6 large muffins (pictured above).  Do not level or flatten muffin surfaces but gently press almonds to surface so they adhere.

4.  Bake until golden brown and a toothpick test produces a few moist crumbs, about 16-20 minutes or 20-25 mins for jumbo tins.  (You may want to consider a slightly lower oven temp if using jumbo tins)  Cool muffins in pans 5 mins and transfer to a wire rack for 10 mins before serving.

5.  Serve with a generous layer of jam and enjoy!  

Note:  These muffins freeze well.  I individually wrapped each muffin in plastic wrap first and then tin foil. Then, I stored wrapped muffins in a freezer bag.  Mine kept well for at least 6 weeks (and likely can be kept longer).  To defrost, either pop them back in the tins and put them in oven or take them out of the freezer the night before to thaw.  If you're in a pinch, you can even microwave one for about 1 min or so also the texture will be slightly different after microwaving.  

Recipe adapted slightly from America's Test Kitchen


Thursday, May 3, 2012

Hearty Cinnamon Granola

YUM.  Trust me on this one.  YUM.  As much as I love a bagel or waffles or even a bowl of cereal, one of my favorite breakfasts is still fresh fruit, yogurt, and granola.  It's got all the best things- sweet fruit, tangy yogurt, and crunchy granola.
But here's the thing, most store-bought granola is some kind of crazy calorie-packed "health food."  It's like granola makers just kept daring each other to make a granola with more calories than the other person.  And now the result is record-setting calorie levels in the country's granola.  I'm pretty sure that's what really happened.
And I recognize the irony of my calorie-complaining because my previous post was Brown Butter M&M Cookies.  But I don't eat those for breakfast (usually).  So I was determined to find a lower calorie version of granola.  Aaaaannddd, I did!  
The great thing is, granola is totally customizable.  If you've got the basics down, you can mix in any dried fruits, nuts, or cereal you like.  And I love to eat it with yogurt and fruit but it's great for snacking or even with a bowl of milk.  And snacking.  Lots snacking.  So much snacking.  

Here's the recipe!

Ingredients
3 cups of rolled oats
2 tsp cinnamon
1/2 cup slivered almonds
1/2 cup sliced almonds
1/2 cup applesauce
1/3 cup honey
1 Tbsp vegetable oil
1 tsp vanilla extract
3/4 cup coconut
1/2 cup dried cherries
1/2 cup dark chocolate chips
1/2 cup dried cranberries

1.  Preheat oven to 325 degrees and slightly spray a baking sheet.
2.  In a large bowl, combine oats, sliced and slivered almonds, and cinnamon.  Mix until combined.  
3.  In a medium bowl, combine applesauce, honey, vegetable oil, and vanilla and whisk until incorporated.  Make a well in the center of the oat mixture and pour the applesauce mixture in the center.  Using a rubber spatula or wooden spoon, combine ingredients until well coated and evenly mixed.  
4.  Pour onto prepared baking sheet in an even layer and bake for about one hour,  stirring every 15 minutes while baking.  Incorporate coconut about half way thru baking.  Granola should be golden brown and slightly crisp when done.  Allow to cool on baking sheet.  When cooled, stir in chocolate, cherries and cranberries. Store in a sealed container to keep fresh.    

Enjoy!